
So, you’ve moved beyond just navigating through the calendar to see today’s schedule. You’re ready to get a bit more out of the app by tracking notes, scheduling tasks, and maybe even accepting a payment!
From the calendar, tap on any client’s name on the schedule to open the Appointment Detail window.
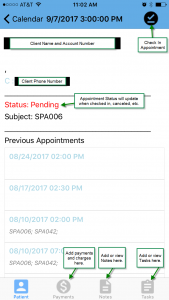
This window shows you the client’s name, contact information, the Appointment Status, Appointment Subject, and the most recent Previous Appointments. To Check In the Client, tap the black check mark in the top right corner. The menu bar at the bottom allows you to view and update Payments, Notes, and Tasks.
Payments at Check-In Window
Tapping on the Payment icon in the menu bar will populate the Payment Window:
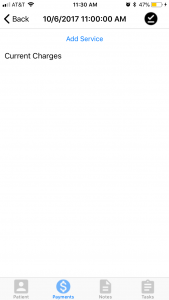
If any charges or payments are already associated with this appointment, those will show up on this window. If no charges or payments have been added, tap “Add Service” to open the Payment Detail Window.
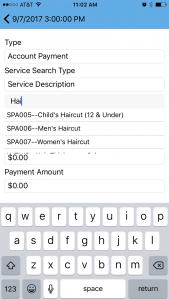
From this window, you can add in charges, payments, or both. The “Type” box will allow you to choose your appropriate payment type, exactly as in the Simpatico Web Application. When selecting a charge for the client, you can choose between searching these by Code or by Description. This Find-As-You-Type search box then functions exactly as in the Web Application. Type in the first few letters or numbers of the code or item description, then you can tap on it in the resulting drop-down.
After adding in any necessary charges, quantities, and amounts (or skipping that step if you’re only adding a payment), enter in the Payment Amount in the last box. Then tap the “Add Payment” button to submit the payment.
Notes
Tapping on the Notes icon in the Menu Bar will populate the Notes Window:
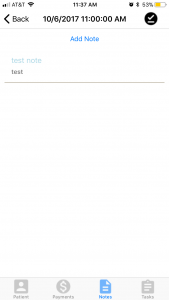
Here you will see any Notes on the Client Account. Tap on a Note to expand it and read more. To Add a New Note, tap on Add Note.
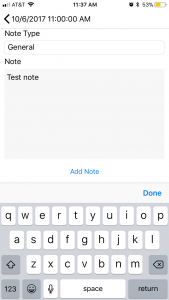
From the Add Note Window, you can select a Note Type, type the content of that note, then tap Add Note to save the information.
Tasks
Tapping on the Tasks icon in the Menu Bar will populate the Tasks Window:
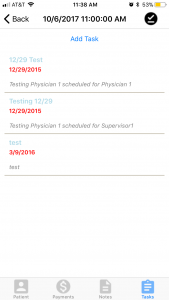
Here you will see any Tasks on the Client Account that are assigned to you. Tap on a Task to expand it, read more, and update it. To Add a New Task, tap on Add Task.